
As I mentioned in a previous post, I went to Lost Maples State Natural Area to go hiking and shooting astrophotography. It was a moonless night, it was supposed to be clear, and I wanted to find a nice dark place to take sky pictures. I decided on a hike-in primitive campsite up on a ridge as I thought that it would have a nice view of the sky. The image below shows the trails map of the park. I parked where Parking label is near the Trail to Day Use Area, I then put on my pack and hiked up to Primitive Campsite B (see the map below).
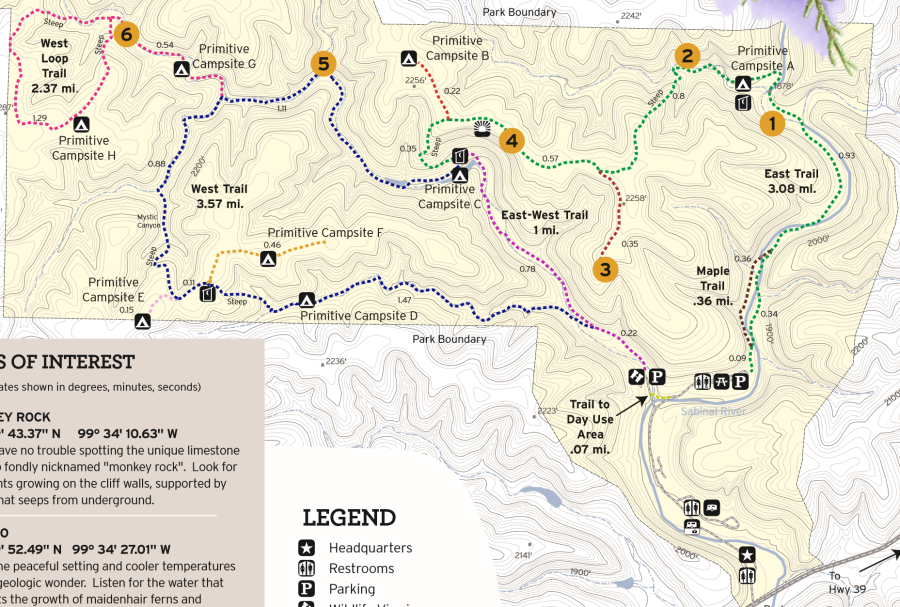
The first mile of trail was not bad, but the part where it says “steep” is a climb to the top of the ridge along a trail covered with loose rocks. I was carrying a tent, inflatable mattress, camera, tripod, a lot of water, etc. on my back and I had to stop and rest several times. But, I made it to the campsite and got set up by 7:00PM. I found that I had the entire campsite to myself, which I kind of liked.
I hiked around a bit, took pictures, planned out where I would be when it was dark and went to bed just after sunset. I set my alarm for 12:00AM as that is when the galactic core should be up in the sky to the South. When I woke up and looked at the sky outside, the Milky Way was clearly visible to the unaided eye and I got excited to take some pictures.
I put on my headlamp and used my flashlight to walk down to the edge of the cliff. I wanted to make sure that I stayed at least a couple of meters from the edge in the dark. I set up my tripod and camera and found that Mars was so bright that I could use it to set focus using live-view zoom.
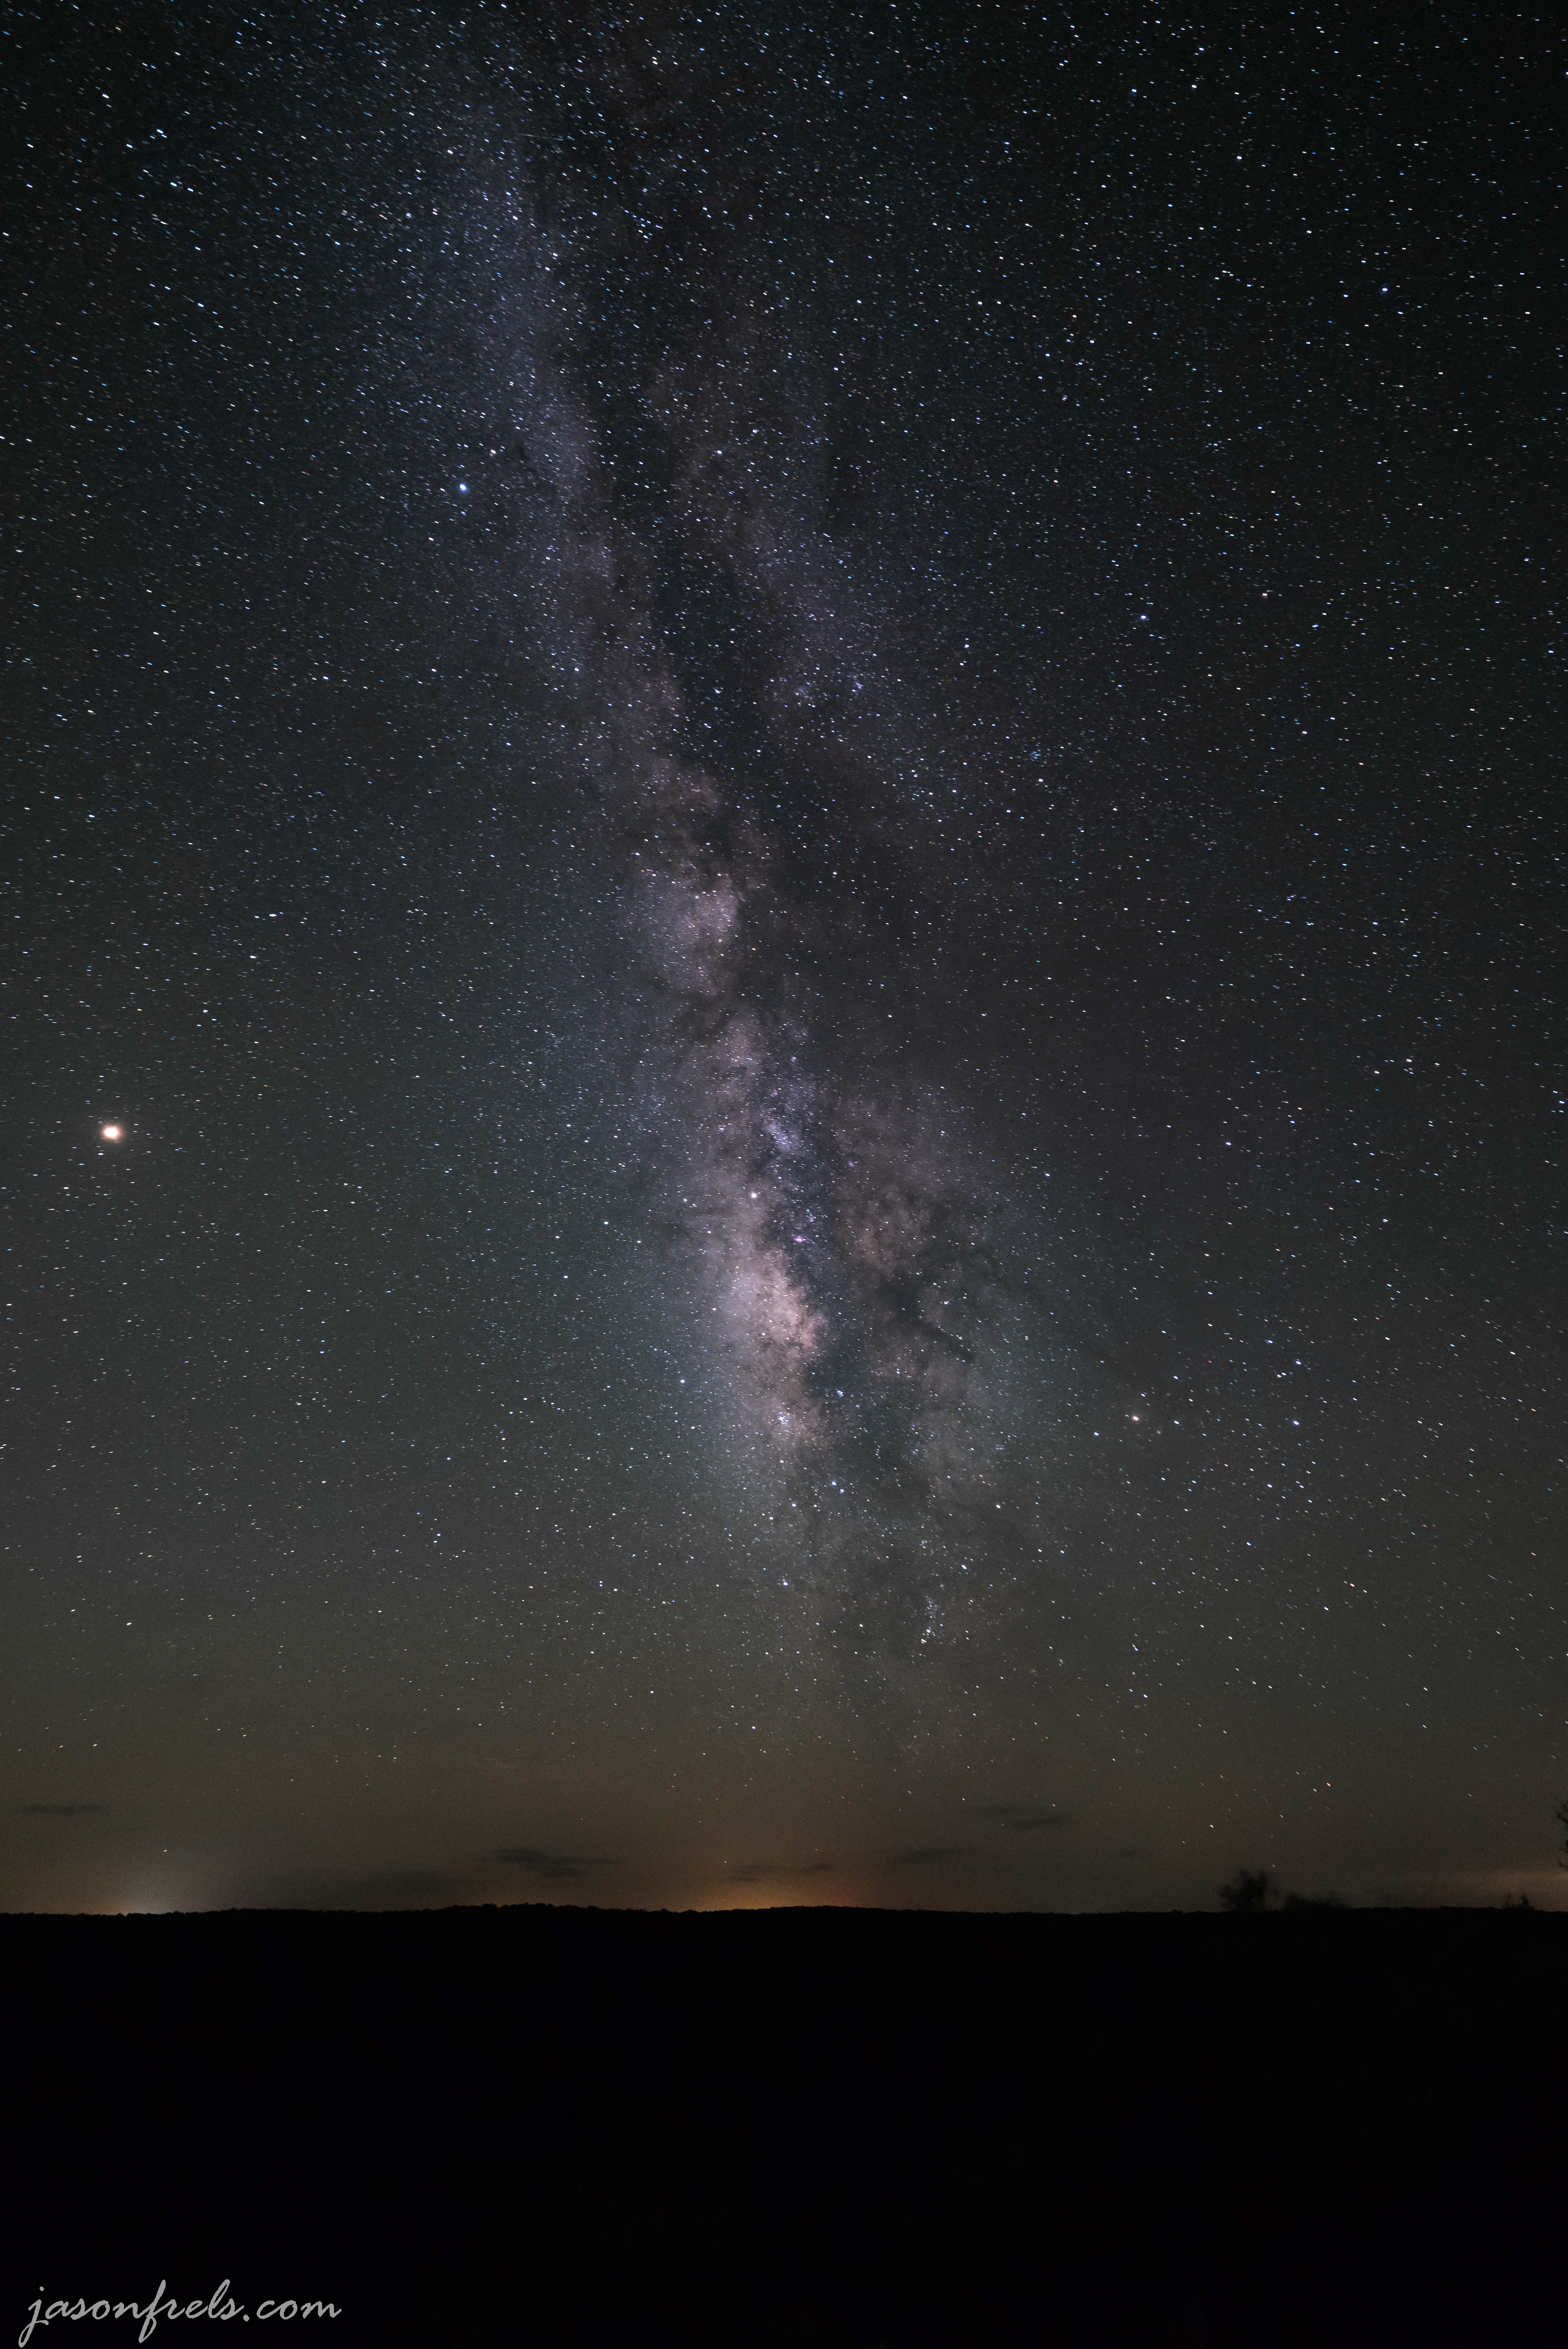
In the image below, you can see the galactic core in the sky with Mars the bright planet to the left. There was just a hint of clouds on the horizon, but they were starting to build. I could barely see the lights on the distant horizon, but the camera could and I was pretty high up. There is also a hint of light in the valley, I think where my car is parked.

I found that I was generally having good results using ISO3200. I tried exposures of 20 -30 seconds as a 14mm focal length should allow me to do this without the stars running noticeably. I also flipped the camera to portrait mode in an attempt to get more of the galaxy in the image.
The dense galactic core really showed up well thanks to the dark clear night I was having. I also took time to just sit and look at the sky as this is not something that I can see in the metro-area where I live. I eventually moved over to a park bench on the trail and recomposed the galaxy with some trees in the foreground.
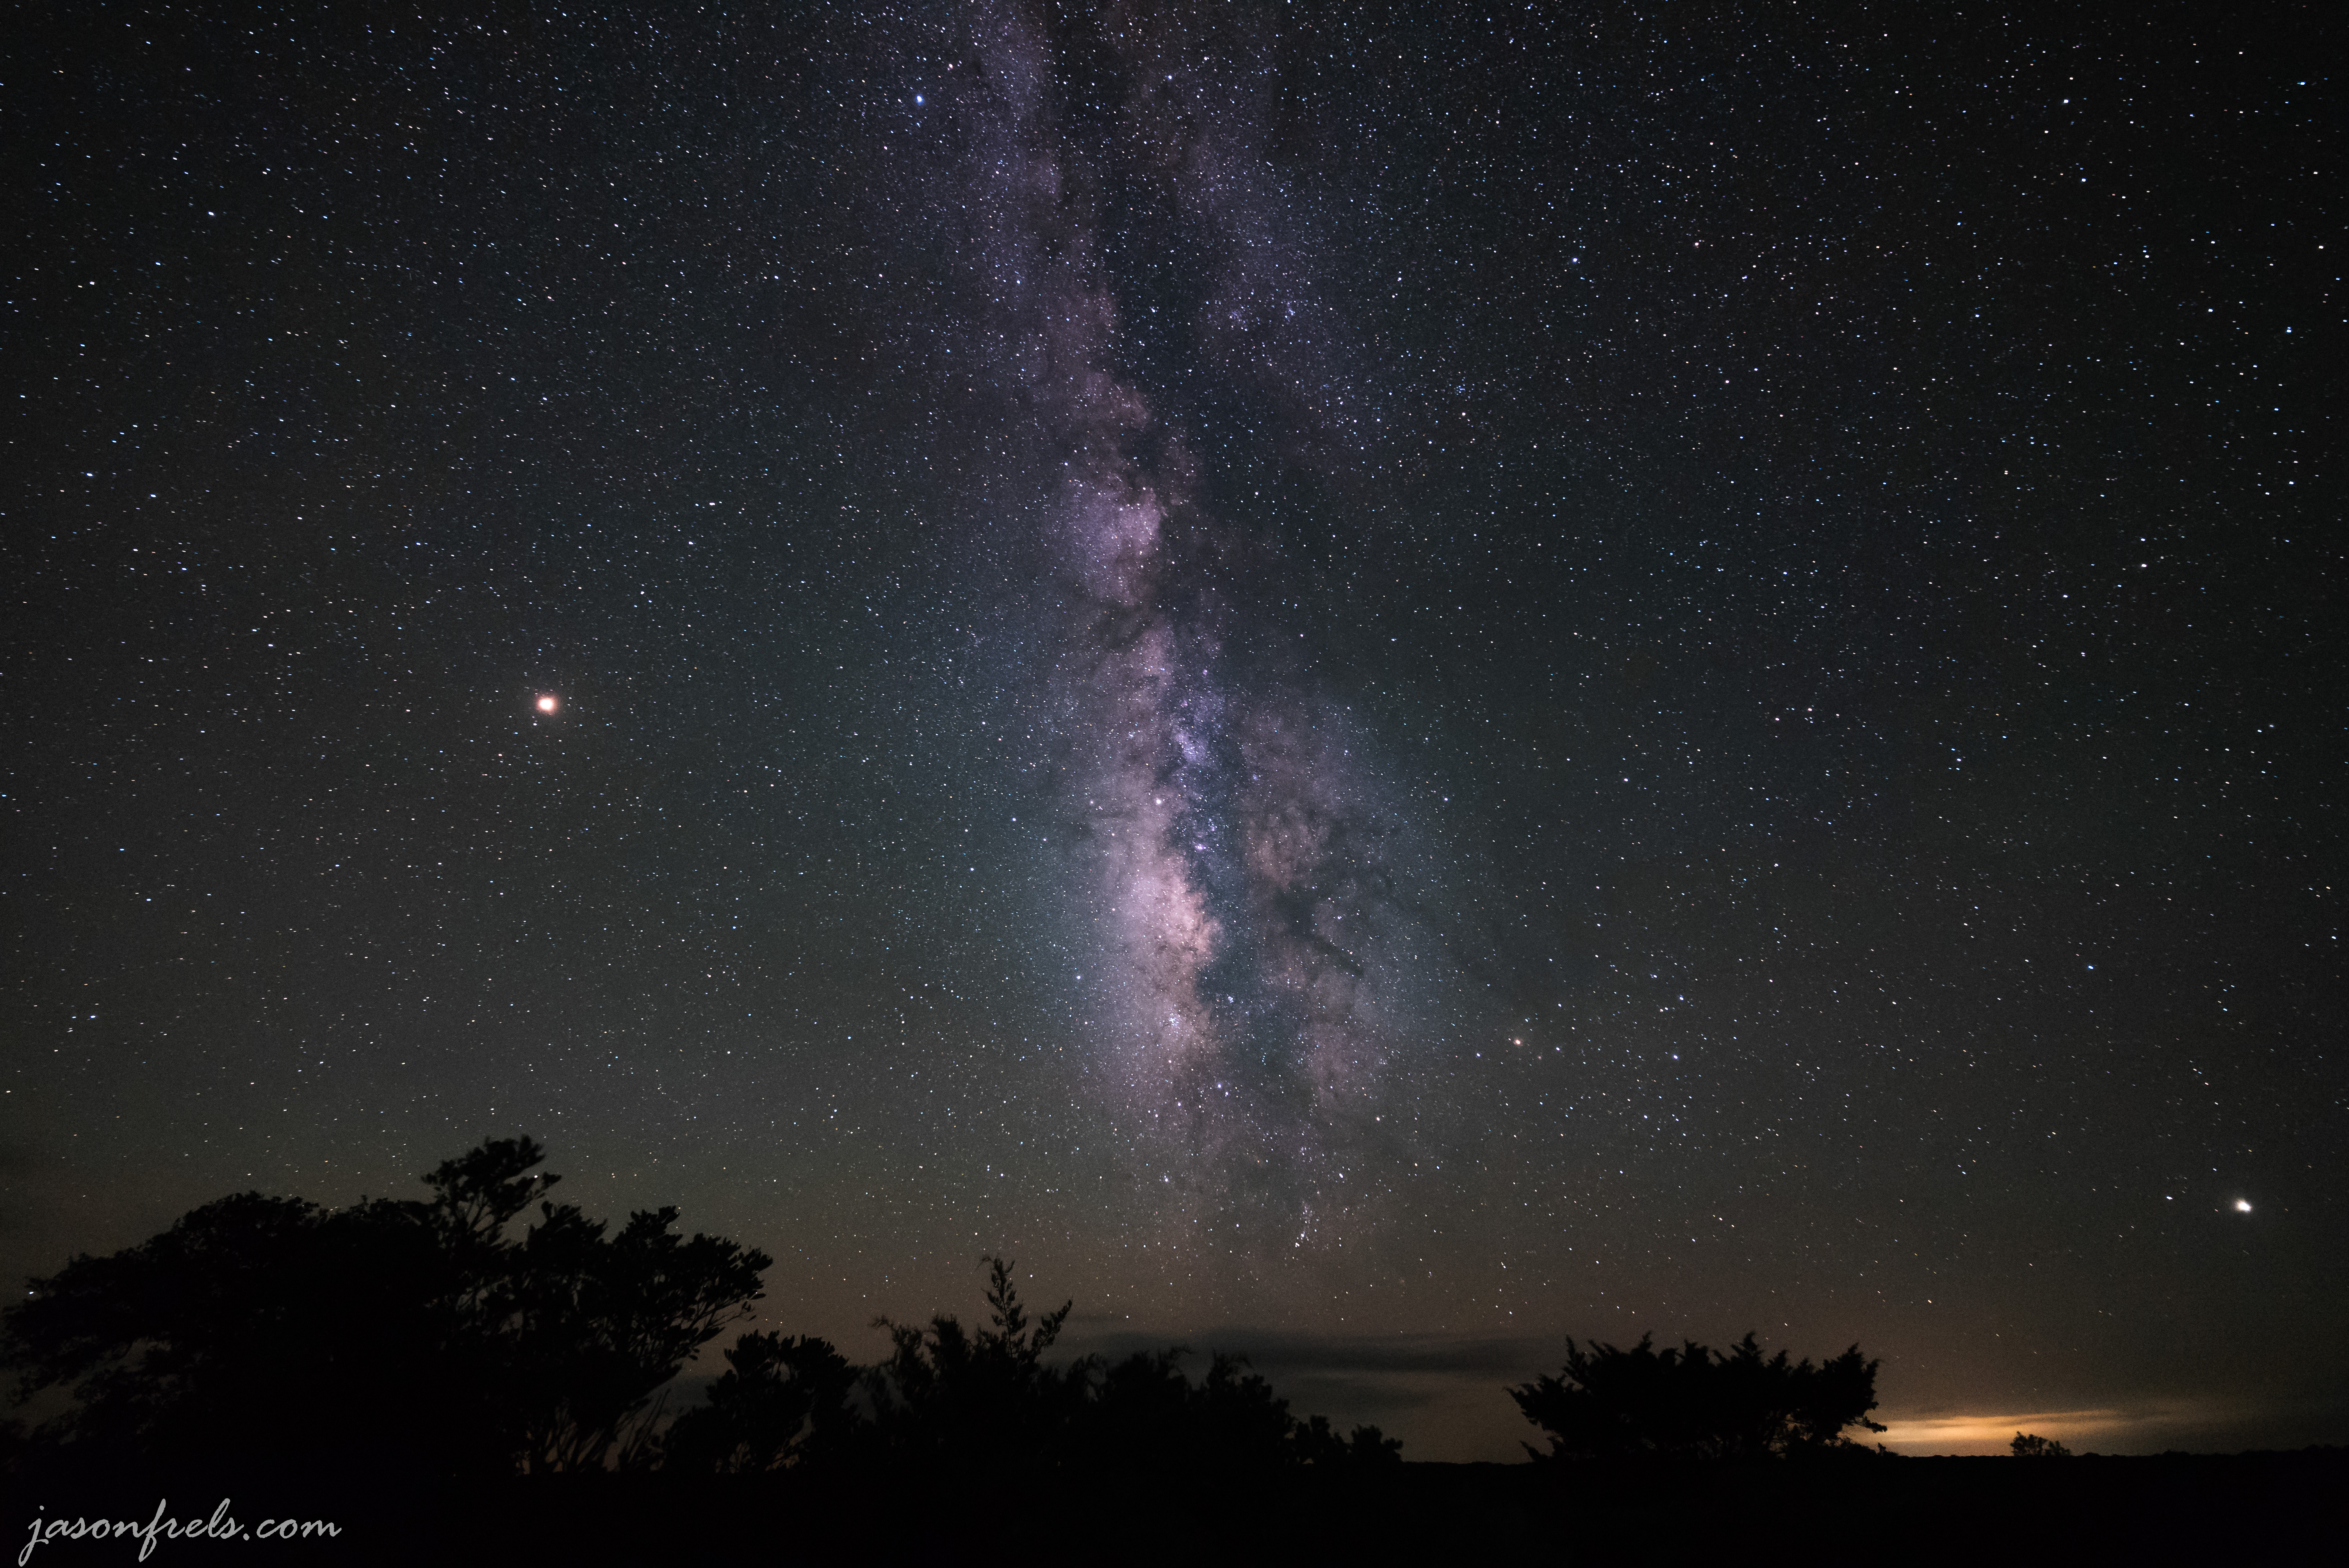
You can see that in addition to Mars to the left, Jupiter is also very bright to the right near the horizon. And Saturn is between them in the midst of the Milky Way. The clouds were building at this point; you can see the light from Leakey reflecting off them on the horizon.
I decided to set the camera up behind me and take a picture with me staring at the night sky. It was just going to be a fun picture to show people but this turned out to be my favorite picture as it really captures what I was feeling that night with the solitude and the beauty of the universe set before me.

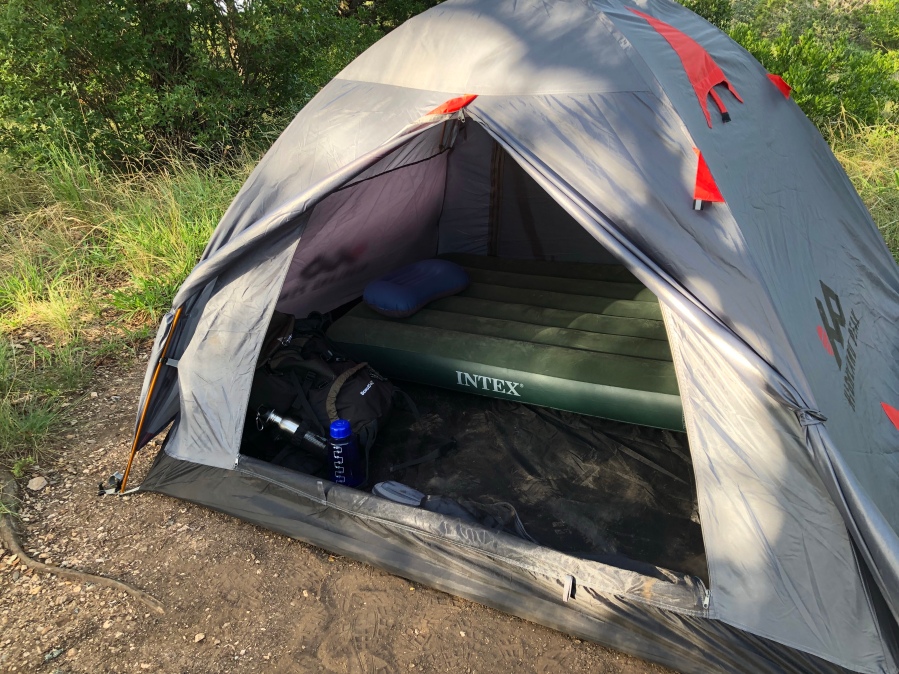
It is probably the only selfie I will do this year and I think I look pretty good when it is so dark that you can’t see me. I also took the obligatory glowing tent photo and then went back to bed.

Those were my best night sky photos. I feel good about the night I had and I accomplished my main objective. I would like to try again and perhaps find a place with some interesting foreground to create some interesting compositions. The galaxy should be here from several more billion years, so I should have another chance.
I would like to go over the tools and techniques that I used in making the above photos. First, the gear. The night sky is so dim that it really requires a camera with a sizable sensor and a wide aperture lens to get good results. The larger the sensor, the more light is available for the same amount of megapixels. My camera has a full-frame, 24MP sensor, but you can also get decent results with an APS-C sensor DSLR with a good sensor.
Also, the wider the base aperture of the lens is, the more light you can get to your sensor. You probably want f/2.8 or better to avoid having to use extremely high ISO. I purchased this Rokinon 14mm, f/2.4 lens mainly with astrophotography in mind. I got pretty good results at ISO3200 with this lens. There are better and more expensive lenses available for more money.
You probably want a lens that has a focal length of 24mm (full-frame equivalent) or less to capture enough of the sky. Also, the wider angle the lens, the longer you can expose without noticeable star trails.
You also need a tripod and remote shutter release to reduce camera shake. My camera gear is pictured below.

The settings I started with were:
- Manual Mode, nothing auto will work for the night sky.
- Set the aperture to f/2.4, as wide as it will go to get all the light possible.
- Set the ISO to 6400 for high sensor gain
- Set the shutter to 20 seconds. There is a rule of thumb that you can go up to 500 divided by the focal length on the shutter speed before the star run noticeably. I stayed under this (35s).
- Select manual focus as auto-focus will be of no use on dim stars. My Rokinon lens is manual focus only.
- Enable Long Exposure Noise Reduction to clean up the image a bit. This makes each shot take twice as long as it takes a noise subtraction shot with the shutter closed.
- For focusing, I found that I was able to zoom in on Mars using live view to manually focus the lens.
- Enable remote shutter release
I then had to adjust the camera to the composition I wanted based on test shots as it was too dark to see in live view. I then experimented with different shutter speeds and ISO settings.
I hope this was interesting. Please leave comments, suggestions, or questions below. Thanks.

This is superb stuff, Jason! Thanks for sharing your experience. Brilliant.. 🙏
LikeLiked by 1 person
Thanks for the great comment.
LikeLiked by 1 person
Really spectacular! I love staring at the night sky, but the detail in your photos is better than I can see on my own.
LikeLiked by 1 person
Yeah, I need to figure out how to do a 20 second exposure with my eyes.
When I was out there, I could see the Milky Way across the sky, but it was quite a bit more pale than the long exposure photos. It is very impressive to see this, especially as I live in an urban area and ordinarily only the very brightest stars and planets are visible at night.
Thanks,
LikeLiked by 1 person
“20 second exposure with my eyes.” That’s funny!
LikeLiked by 1 person
Those are great pictures.
LikeLiked by 1 person
Thanks. I appreciate the compliment.
LikeLiked by 1 person
Fantastic pictures, well worth the effort of the hike I think. The portrait one is my favourite. If it was mine I would definitely have a large print of that on my wall 🙂
LikeLike
Thanks, the climb was pretty miserable with all the weight I was carrying, but as soon as I got to the campsite and took off my pack, it was all worth it. I wasn’t sure how much water to carry so I brought a lot. Water is heavy, but I drank it all. I also brought an inflatable mattress to sleep on. It was a bit bulky and heavy, but so much better than laying on the hard ground.
I was thinking about printing that picture. I am not sure how well something that dark would print. I might consider printing on metal. I ordered something dark like that on metal once and it turned out well.
LikeLiked by 1 person
No pain, no gain 🙂
Yeah, printing is another can of worms entirely. In the past I’ve bought 20″ x 16″ prints of some of my landscapes from a cheap online service and they worked OK. However I think that you’re right to be concerned about printing a dark photo like that but metal sounds interesting.
LikeLiked by 1 person
[…] addition to shooting pictures of the night sky at Lost Maples State Natural Area, I also did a bit of hiking. There are many things to do at Lost Maples. I saw people swimming in […]
LikeLike
[…] discussions on message boards, and experimented in Lightroom (and a few other tools) a bit. For my last round of pictures, I settled on an editing routine that is combination of a discussion that I have had online and […]
LikeLike
Very interesting article, thanks for sharing your settings. I’ve been wanting to try astrophotography, but haven’t done yet. Amazing shots!
LikeLike
[…] my personal favorites of the year. It is me sitting on a park bench in the middle of the night at Lost Maples State Natural Area with the milky way, Mars, and Jupiter in the sky in front of me. I probably love this photo because […]
LikeLike
[…] sky photography that I would like to get out to. For instance, Lost Maples State Natural Area where I went last July, you can really see the difference in light pollution looking at those pictures. I haven’t […]
LikeLike
[…] night before summer ended. I have been to other sights with very little light pollution, like Lost Maples State Natural Area, but none as dark as Big Bend. So, I watched the forecast for a couple of weeks, planning my road […]
LikeLike