One of my struggles with Milky Way photos has been how to edit the photos. I have watched multiple videos online, had discussions on message boards, and experimented in Lightroom (and a few other tools) a bit. For my last round of pictures, I settled on an editing routine that is combination of a discussion that I have had online and some videos that I watched on YouTube.
The photo that you get out of the camera is OK, but a bit dim, lacking contrast, and perhaps too orange. I don’t think that cameras can do a good job of judging white balance with the night sky. Below is one of my photos from my recent shoot. This is the JPG preview from Lightroom without any modifications.

The first things that I usually do with a photo when I get it into Lightroom is apply the lens correction mask and adjust the exposure. The lens correction mask mainly deals with the vignette and may not be important if you have a better lens than mine. See the screen capture from Lightroom below. Bringing the exposure up brings up the galactic core, but it also brings up the light pollution as well and you get an image that is a bit hazy. I also adjust the noise reduction slider up a bit to reduce the grain in the darker areas of the image.

If you just use the global contrast slider to try to get rid of the light pollution, you lose a lot of the galaxy as well. To deal with this, what I generally see done is to adjust the tone curve. This involves grabbing the high end of the tone curve and dragging it up a little bit and grabbing the mid-tone part of the curve and dragging it down a little. This serves to brighten the Milky Way a bit and bring down some of the light pollution noise scattered in the atmosphere (I think). I experiment with this curve a bit, but I find if I put the middle point near the edge of the mid-tone information and adjust it here that I get good results (see the tone curve on the lower right in the image below).

Another trick that I learned from a video is using the adjustment brush tool. You select the tool and adjust the brush size to a bit smaller than the Milky Way with some feathering, and then paint over the Milky Way. If you hover over the tool dot, it will highlight in red what you have painted, see below. Now you can apply adjustments to only what is selected by the brush. At this point, I bump the exposure a small amount and apply a little bit of the clarity for micro-contrast. This makes the galaxy stand out in the sky a bit more. If you overdo this, it will look horribly fake.

I then attempt to adjust the colors in the image. As I said earlier, I find the pictures out of the camera to be a bit orange. I have tried just adjusting the white balance, but that leaves me with a very blue sky and I am just trying to knock down the yellows and oranges. I generally go to the HSL sliders and de-saturate the yellows, oranges, and greens a bit, then I bump up the saturation on the blue and magenta a touch so it doesn’t look too washed out. This reduces the orangeness of the light pollution on the horizon and gets rid of a green color cast in the sky (see the screen capture below).

That is the bulk of the adjustments that I make. If there are other objects in the picture, I might work to bring those items up a bit. I try to not to make large adjustments as I don’t want my pictures to look fake.
Below are the before and after exports of this photo. Not a super dramatic change, but I think the after image looks better. The Milky Way is a bit more dramatic, but not over the top.


What do you think? Do you have any tips or practices for adjusting night sky photos in Lightroom? Or do you use a different tool that gives you better results? Please leave a comment below.
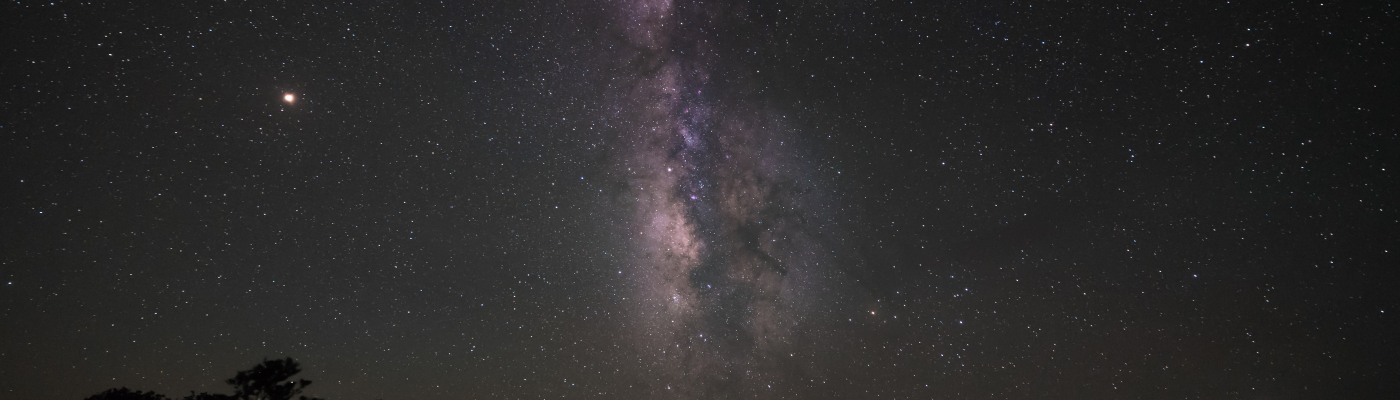
I also think it is fun to look over the night sky pictures and try to identify a few things. In the below image I labeled a few things that I could find in the sky. Mars, Saturn, and Jupiter were easy to see. There is a bright nebula that I think showed up well in the middle of the Milky Way. The constellation of Sagittarius is there, but kind of difficult to outline. Scorpius is kind of easy to see with the bright star Antares. It’s fun to dream about what’s out there.

Thanks for reading. Please leave a comment.

Very cool
LikeLiked by 1 person
Thanks!
LikeLike
Thanks for adding the names to the last photo. It helps a non-astronomer like me. I was able to pick out Mars and Jupiter in your previous Milky Way post, but could not identify the rest.
LikeLiked by 1 person
Thanks, I enjoyed doing that. I keep a program on my computer called Star Walk to help figure out where everything is. I realized as I was making the marked up image that I could easily be there several hours.
LikeLiked by 1 person
Nice write up and explanation, thanks. How long did the editing take?
LikeLike
Once I got the hang of it, a couple of minutes per picture. But I did spend a lot of time experimenting at first as well as watching YouTube videos.
LikeLiked by 1 person
Thanks for sharing how you edit your Milk Way photos! I recently shot the Milk Way for the first time and was having a hard time editing the photo. Cant wait to get back up in the mountains again to take some more night photos!
LikeLike
It can be addictive. Hope you get some great shots.
LikeLiked by 1 person
Thank you for the very detailed explanation and sharing of your workflow. Even though I don’t use Lightroom, I’d picked up a couple of ideas to experiment.
LikeLiked by 1 person
I have tried using a star-stacker program. I got OK results, but there must be some techniques I need to learn to make that work better.
LikeLike
[…] I shot mostly at ISO4000 and ISO5000 with the lens wide open. If you go zooming in, you can see a little movement in the stars, but it is not too bad. I did mostly edit using the same techniques that I discussed in this blog. […]
LikeLike