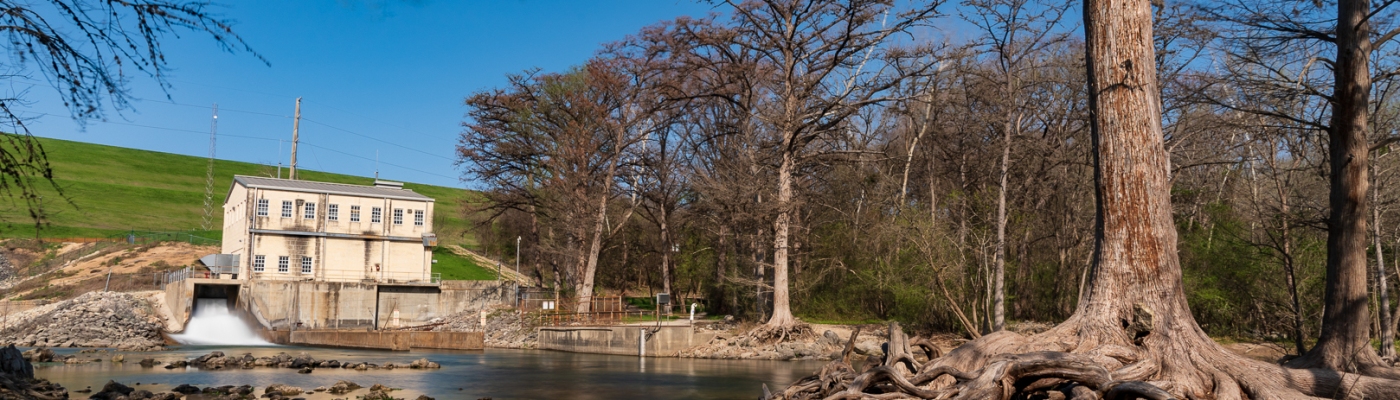
One windy morning I went to a hiking trail near the Canyon Lake dam. The trail went down the hill to the river just beneath the dam. There were trees with gnarly roots sticking out of the water and a building and spillway in the distance. So I set about taking a few long exposures.
It was cool and windy and the vantage point that I wanted had my tripod out in the shallow river. So I took off my shoes and socks and carried my camera and tripod out into the river. The water came about halfway up my shin and was very cold, almost too cold, but I tolerated it for about 10 minutes and took some photos.
The trees were quite tall and I struggled with how much of the trees I needed in the frame. I ended up with a vertical photo that I like the best that features most of the trees and roots with the dam building in the background.

There was a lot of sunlight on this morning and so even with the ND filter this is only a 4 second exposure. But that was plenty of time to blur the water falling over the little spillway in the distance. I call it a spillway for lack of knowing the proper term, but it is just relieving the lake of enough water to keep it at a good level.
I got out of the water and sat and put my shoes back on and then walked up closer to the building. The photo below is taken from dry land about 13 minutes later. The sky looks a lot bluer even though both images were edited the same way. I think that the sky might have been clearing a little.

One thing that the ND filter does is kind of throw off your white balance. Both of these pictures were quite yellow with the default camera white balance. I re-balanced using the white of the water in the spillway to get what you see above, which I think is quite accurate.
I really like those tree roots but I am not sure that I have done them justice. Perhaps if I had gotten in close them with an ultra-wide angle lens it would have made for an interesting photo. But, I didn’t bring my ultra-wide lens and I wasn’t about to go that deep in that frigid water to get near the tree trunks. That seems like a summer picture.
Adobe Enhanced
On another topic, Adobe has recently added an Enhanced feature to their suite of products. You’ve probably seen a movie where the FBI director tells the tech to enhance some grainy picture to see a detail and, as if by magic, the picture shows all sorts of new information. Well, that’s science-fiction, but what this feature promises to do is something similar. It should allow you to increase the resolution of an image by 4 times and it figures out what information to recover to create the new pixels. So, I put this feature to the test using an image that I took on this day.
Below is an image that I took that day. I didn’t spend a lot of time editing it for beauty as I was mainly interested in playing with this Enhance feature. The process involves opening the image in Adobe Camera Raw and then selecting Enhance. The default setting is increasing the resolution by 4 times and that is what I did. The process takes about a minute. The resolution of this image out of the camera is 24 megapixels or 6016 x 4016. The enhanced image ends up at 96 megapixels or 12032 x 8032. I am not attaching that enormous file here.

What I really wanted to see was the detail that it adds, so I took both images and did an extreme crop of the windows of the dam building. The first image below shows a crop of the 24MP camera image.

The next image is a crop of the enhanced 96 MP version of the image. You can see that it is a bigger image because it should have about 4 times as many pixels as the first crop.

If you can’t tell anything from those images, I zoomed way in and took a screen capture such that you can see the pixels in the 24 MP image on the right below. You can see more new detail in the enhance image, especially on the rain gutter, window frames, and texture in the brick.

It doesn’t look bad though I am not sure the bricks actually have that texture. I don’t think that it is a substitute for using a 100 MP camera and appropriate lens, but I am not spending the money for that. It might be useful for printing out a very large canvas of an image. I have printed 20 x 30 inches with my 24 MP images and they look good even if I hold it close to my face. The Enhance feature seems to work well enough, but I suspect that it greatly depends on what it has to work with in the original image.
Let me know what you think below. Thanks for reading.

I love those gnarly roots. They make for a gnarly picture. And very unique.
The new enhancement does a pretty good job, in my view. There seems to be a little bit of graininess in the crops (which any farmer would appreciate), but I’ll bet it’s much clearer than without the enhancement.
LikeLiked by 2 people
I like the roots too. I don’t think I handled them well.
The enhancement was more of a curiosity. I think I’d have to print out an enormous canvas to see a difference.
LikeLiked by 2 people
the roots were the first thing I noticed as well; great job capturing those and the building…
LikeLiked by 1 person
I’m rooting for him to go deeper in the water, for a better close-up.
LikeLiked by 1 person
I was impressed with how far in he went, especially given how cold it was…
LikeLiked by 1 person
I love the blueness of the sky in the 2nd picture.
Can’t believe you didn’t go deeper for the picture. Once you turned numb from the cold you wouldn’t mind it. LOL!
I did like the difference the enhancement made.
LikeLiked by 2 people
Thanks. I wasn’t getting in any deeper. That river is known for being cold in the summer
LikeLiked by 2 people
I honestly don’t blame you, I wouldn’t have even waded in like you did for the first picture. Even when my friend and I go to the ocean in the summer time I am timid about the water at first, it can’t be too cold!
LikeLike
Resolution is a tricky word. Some take it as a linear measure, others as a measure of area. You’ve gone with area. I’d say the enhanced picture, when compared to the original, has twice the resolution and four times the number of pixels as well as four times the area. As you’ve provided the pixel dimensions before and after, there’s no doubt about what you meant and what the enhancement did.
I want to let you know that some good things in nature are going on at the Doeskin Ranch, so you may want to visit again soon. We spent two hours there yesterday, making the complete circuit of the Rimrock Trail. One star of the show was a flowering colony of Texas bluestars, Amsonia ciliata. There was also a blossoming colony of groundplums, Astragalus crassicarpus var. berlandieri. In several places we came across prairie paintbrush, Castilleja purpurea var. lindheimeri, which is a different species from the familiar Indian paintbrush. And all over the place, including by the parking lot, we saw four-nerve daisies, Tetraneuris scaposa.
LikeLiked by 1 person
Thanks. I need to get out to Balcones soon. I have other plans this weekend, so I hope it keeps for a few days.
The other part of resolution that I concern myself with is the lens. The 16-35mm f/4 that is have is more than sharp enough for my sensor, but for a 100MP sensor, I doubt it.
LikeLiked by 1 person