
A new feature showed up in an update for Adobe Lightroom and I am kind of excited about it so I am writing about it. The feature is called Denoise, with a description that says “Reduce noise with AI.”. You have the option to go back to the manual noise reduction controls if you like. Ideally this feature will intelligently apply noise correction to your photo without destroying detail, which isn’t all that easy. The term “AI” gets thrown around for everything these days and I think that it has kind of lost its meaning, but I figured I’d give it a try and see how it worked.
What is noise and where does it come from anyway? Well camera sensors, like film, are not perfect and often can get the light data wrong by a small amount, especially when the gain is dialed way up (shooting at high ISO). This can show up as pixels that look a little too green, red, or blue; or make the sky look a little dirty. It can also affect your sharpness a bit. When you shoot a well-lit scene near a camera’s base ISO (ISO64 on my camera), you will barely be able find any noise. But noise problems start to arise when shooting a darker scene where the light and color information is near the sensor’s noise floor or when you need a fast shutter speed and you have to increase the ISO to get a good exposure.
The photo below was shot at 800mm focal length, 1/1600s and handheld which required me to use an ISO of 1250, so some noise shows up. I have the full uncorrected image with a section of one of the pumas enlarged so that you can see the noise. If you look closely at the fur of the puma, you can see that some of the pixels have magenta or green noise in them and the sky looks kind of gritty – that is sensor noise.

I originally tried fixing this with the manual sliders for luminance, detail, and contrast, as well as color, and smoothness; but this is a lot of work and difficult to get just right without making the picture look too soft. But since the AI Denoise tool suddenly showed up, I gave it a try. The before and after results are below.


That is a much better result than I usually get manually and I am quite pleased with it. The tool was able to keep some detail in the animal’s fur whereas it looks a bit plasticky when I do it. So you may be thinking that it is just push a button and, boom, a clean photo appears. But it turns out it is a bit more trouble than that. Below, I will describe my experience on my computer. If you have a much better computer, you may have much better results; I don’t know.
Sure, you push the Denoise button and a few seconds later a little preview window pops up. But the preview doesn’t really look much like the final result as the final result looks much better; but that’s OK. You have a slider for ‘Amount’, and check boxes for ‘Raw Detail’ and ‘Super Resolution’, but you can’t use all of these settings together. It also gives you an estimated time. For me it was 11 minutes. I have a 45 megapixel camera and it may be quicker with a lower resolution sensor.
When I was ready to proceed, I pressed the ‘Enhance’ button and off the AI went to rid my photo of noise. It didn’t quite take 11 minutes, but it was close. It’s OK if you have other stuff to do while waiting, but if you are trying to do several photos, it is painful. When it is done it creates a separate raw file with the noise removed. You can then continue editing this just as you would any other file.
The problem comes when you want to denoise a second file, for me anyway. You select the photo and go through all of the steps above, and ten minutes later it says that it has an issue with the video driver and has to abort. I found that just shutting down Lightroom and starting it back up clears the issue and allows me to denoise another single photo. Lather, rinse, and repeat. So, it isn’t perfect and bug-free yet.
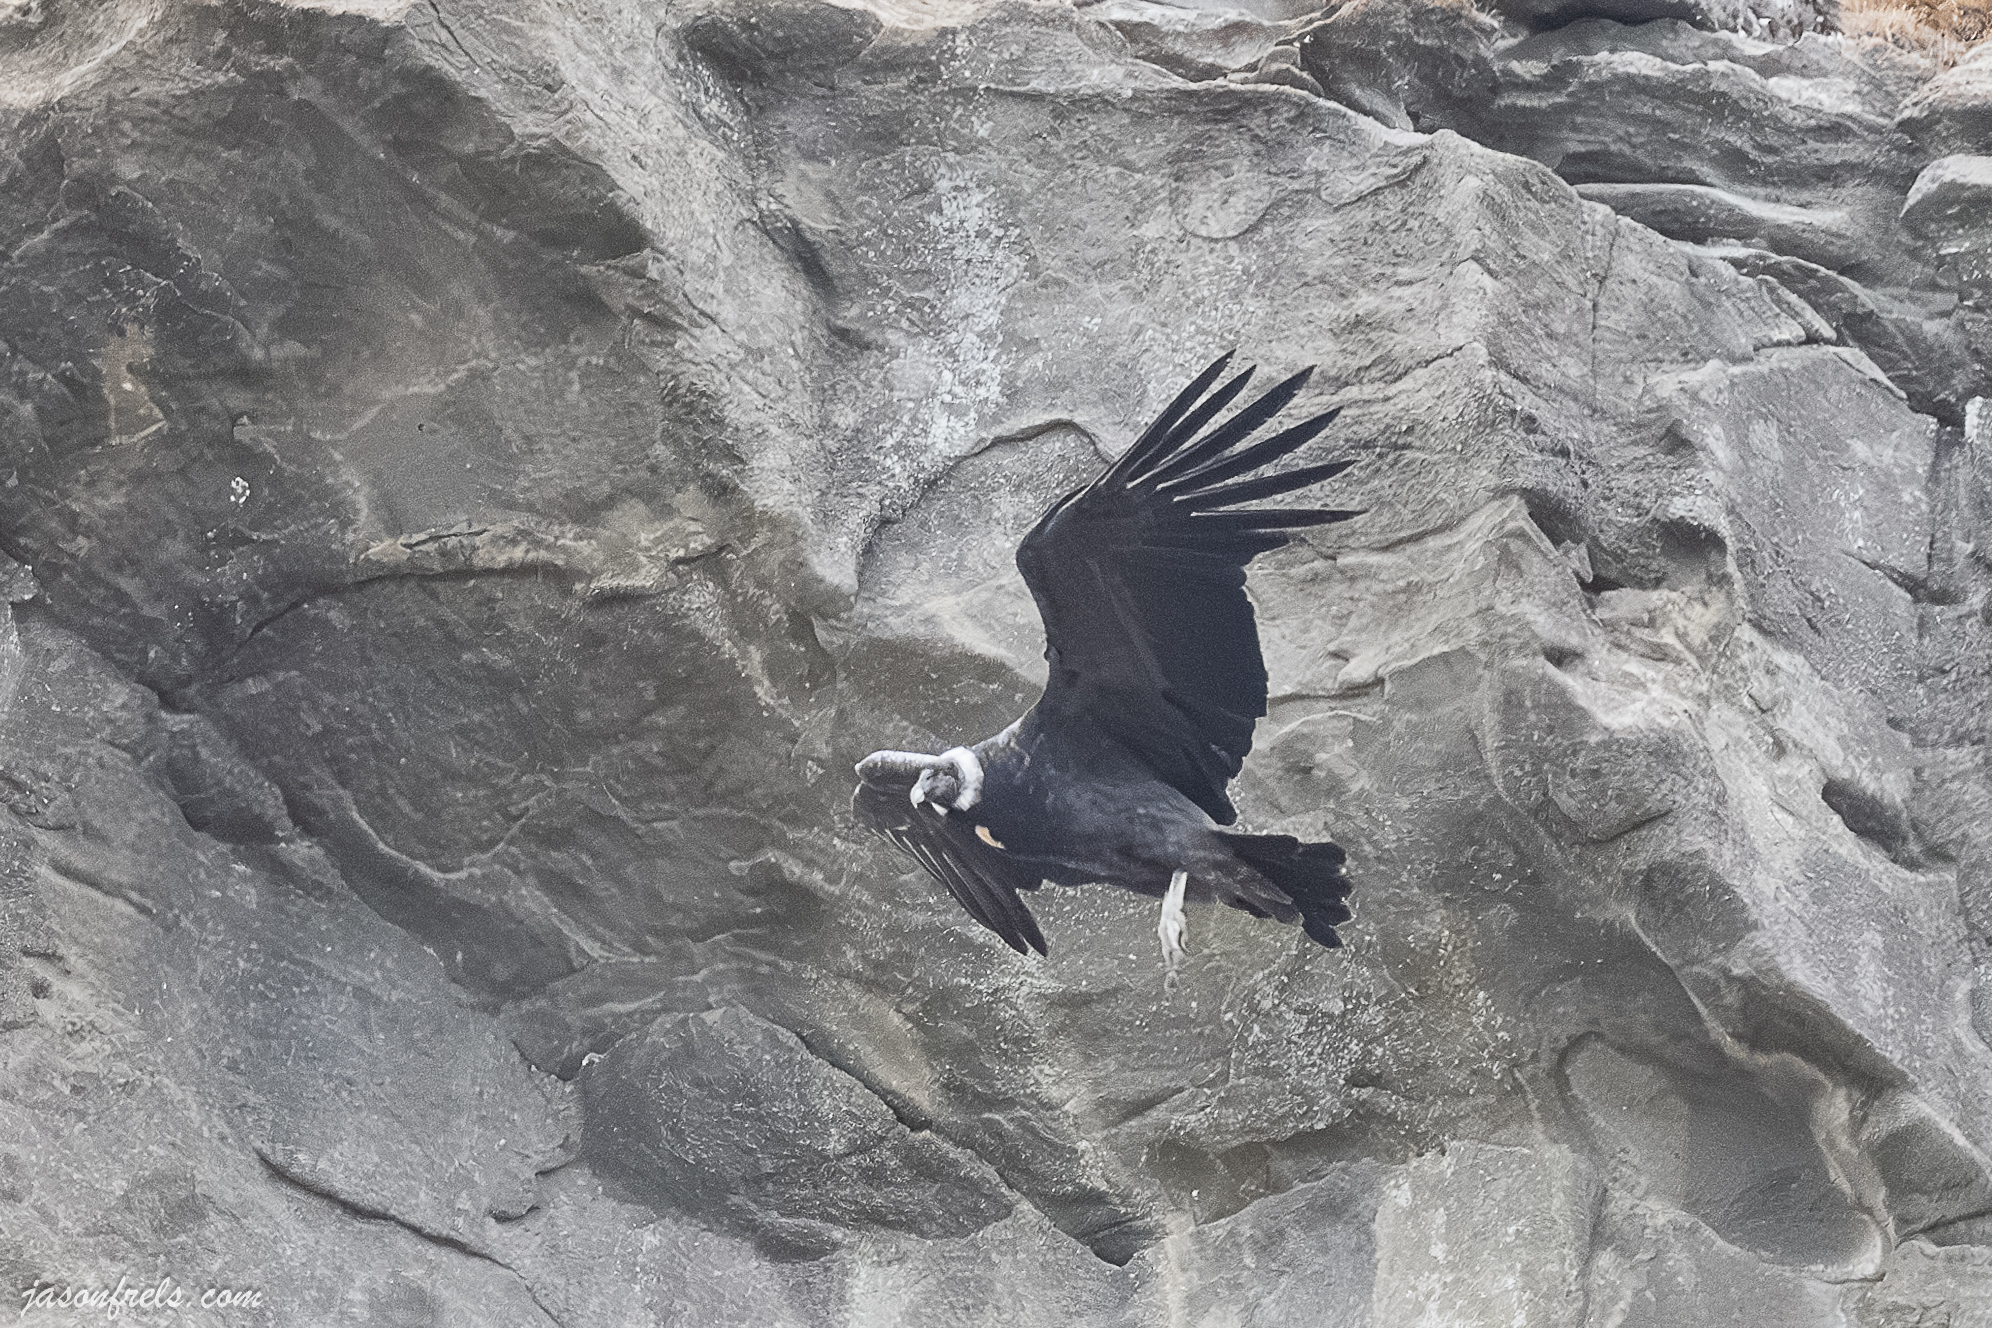
But, if you carefully select a few photos to denoise and you have time, you get really good results. Below is a photo of an Andean condor shot at ISO9000 on a day with heavy cloud cover, so it is a bit noisy. ISO9000 is really pushing the sensor gain hard and you will get a noisy image on any camera at this ISO.

Below is a crop in of the condor with before and after images. It is really impressive how it got rid of the noise and maintained some sharpness. Look how sharp and detailed the cliff-face behind the bird is, that’s kind of tough for me to achieve manually. A really good result.

I also tried this on some night sky photos I took and I didn’t like the results. I don’t think it is good at distinguishing faint stars from noise, so I will have to work on that manually.
That’s my quick review of Lightroom’s new Denoise tool. I generally like it, even though it is slow. It does a great job of removing noise from most images without softening them up too much. I get excited about stuff like this, so I had write a blog and tell everyone about it. Thanks for reading.

Thanks. Good to see another persons reaction to it. My first test was the same as yours. Good results, long time. There is no sharpening at all which I think is good/bad. Good since it keeps the image without artifacts, ad since the pixels are generally softened.
What I have noticed is Lightroom becomes unstable after a few runs. Recently my PC updated to Win11. Lightroom was fine before, now not even close and is a known problem. Reboots should fix the new DeNoise as it appears the function has memory leaks.
For now Topaz and DxO work well. I am a big fan of the other new Lightroom features. If Adobe solves the Win11 problem things should get back to normal. If not DxO Photolab is a good option.
LikeLiked by 1 person
I haven’t tried Topaz, but I have heard good things about it. I haven’t jumped to Windows 11 yet. If I did, I’d probably go with a clean installation rather than an update, though I don’t know if that would be better.
LikeLiked by 1 person
I didn’t plan on the update. One day there it was, running on its own 😳. Like change for the sake of change. I have updated all drivers, keep a clean photo work only machine, and have 40 years IT experience. 😡.
LikeLiked by 2 people
Adobe, like many companies, prioritizes new, marketable features over bug fixes. I have seen this in the industry I work in as well. Bug fixes don’t sell I guess.
LikeLiked by 1 person
I’m not sure which is the before, and which is the after photo. The first image looks smooth to me, but when I slide to the right, the next image looks grainy. I prefer the smooth look.
LikeLiked by 1 person
It helps if you view it on a big screen. That condor photo is really grainy before the Denoise. They were a long way away, it was cloudy, and I was hand-holding the camera.
LikeLiked by 1 person
Very challenging circumstances.
LikeLike
The left image is the unprocessed. If you slide toward the left, it covers it up with the right image, which is denoised. This is my first time using that slider feature in WordPress.
LikeLiked by 1 person
Aha! Then it’s the denoised image that I prefer.
LikeLike
I never understood what you meant by “noise” in a 2D image. Now I do, thanks. I always called it degrading, distortion, or blurring. I like noise, better, though the other words are accurate as well.
I admit I was VERY impressed with the difference in the quality of the denoise images! If I were a professional photog, I’d be over the moon about having such a tool to use.
LikeLiked by 2 people
I am an electrical engineer, and we use the term noise for unwanted content in a signal, so it is a common term for me and applies to digital cameras. In the film days, they would have called it grain or graininess in the photos that would show up a lot in the high speed films.
LikeLiked by 1 person
I actually worked as a printer operator for a film processing plant in the 70’s, and graininess is what we called it. That silver paper was heavy stuff to load onto the automatic printers.
LikeLike
Seeing the condor close up is very impressive as are the pumas! But I still don’t want to pet them.
I have learned more about photography than I ever knew before, thanks to you. You teach photography, Tippy gives History lessons. Didn’t know the blog could be so educational. 🙂
The term “noise” with photography was a new term to me. I can see see the benefit of this new tool, have fun with it. We will have fun with continuing to see your wonderful results.
LikeLiked by 1 person
“Noise” has long been a term associated with me.
Along with Tippy and myself, I think that you teach a bit of optimism and thus people are attracted to your blog.
LikeLiked by 1 person
Thanks, that is my goal, glad to know the optimism is wearing off. But be careful, you may soon find yourself more drawn to Hallmark movies.
LikeLiked by 1 person
Maybe a SciFi Hallmark sort of movie
LikeLiked by 1 person
LOL!
LikeLike
Good luck. I still have problems with Alexa and Siri understanding me. 😉
LikeLike