
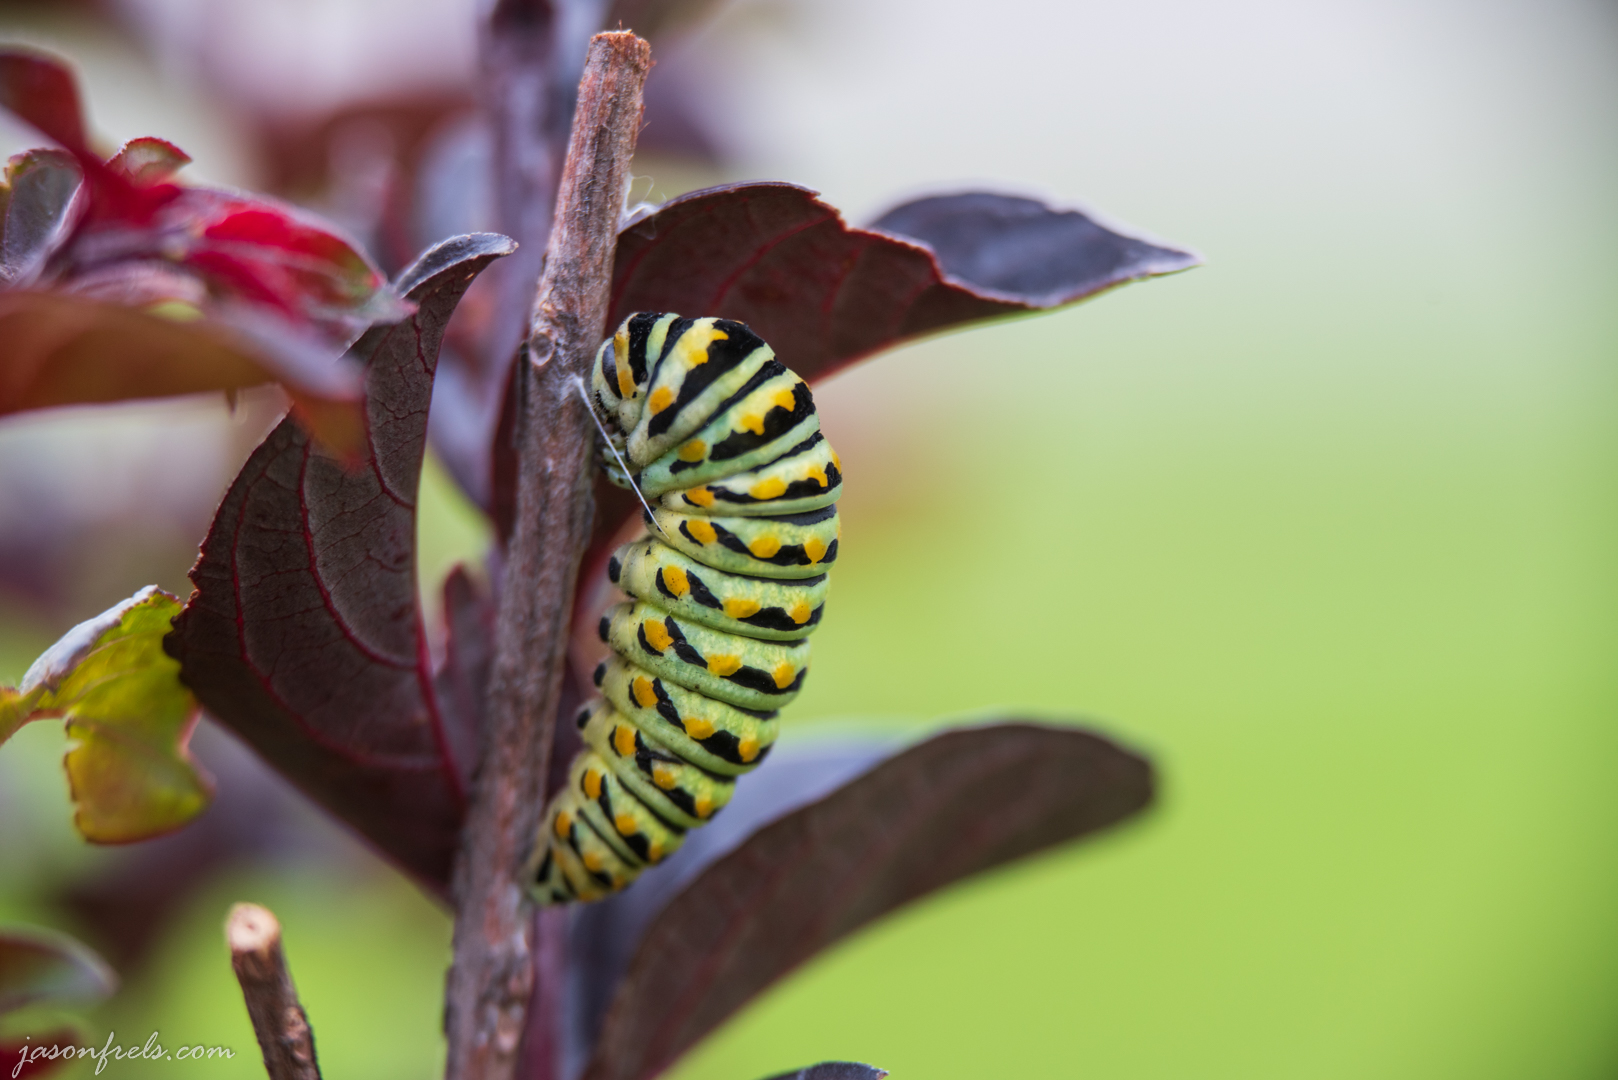
One rainy afternoon I saw a large caterpillar in one my small crepe myrtle bushes and ran to get my camera. I wanted to try to get a macro photo of the caterpillar as it was brightly colored. What I didn’t realize until later when I opened the photos up for editing, is that it was through with being a caterpillar and was actually in the first stage of making a cocoon. Below is a close-up of the caterpillar taken on April 29. You can see that it looks well-fed and has connected itself to the branch and is preparing to make a cocoon.
I continued to check back on the cocoon rainy day after rainy day. This shrub is near my driveway so just about every time I left for work in the morning or arrived home in the evening, I peaked over to check its progress. I occasionally brought out the camera for another close-up. I kind of felt like its clever green camouflage was not very effective with the dark-leaf crepe myrtle, but you wouldn’t really notice it unless you knew to look for it.
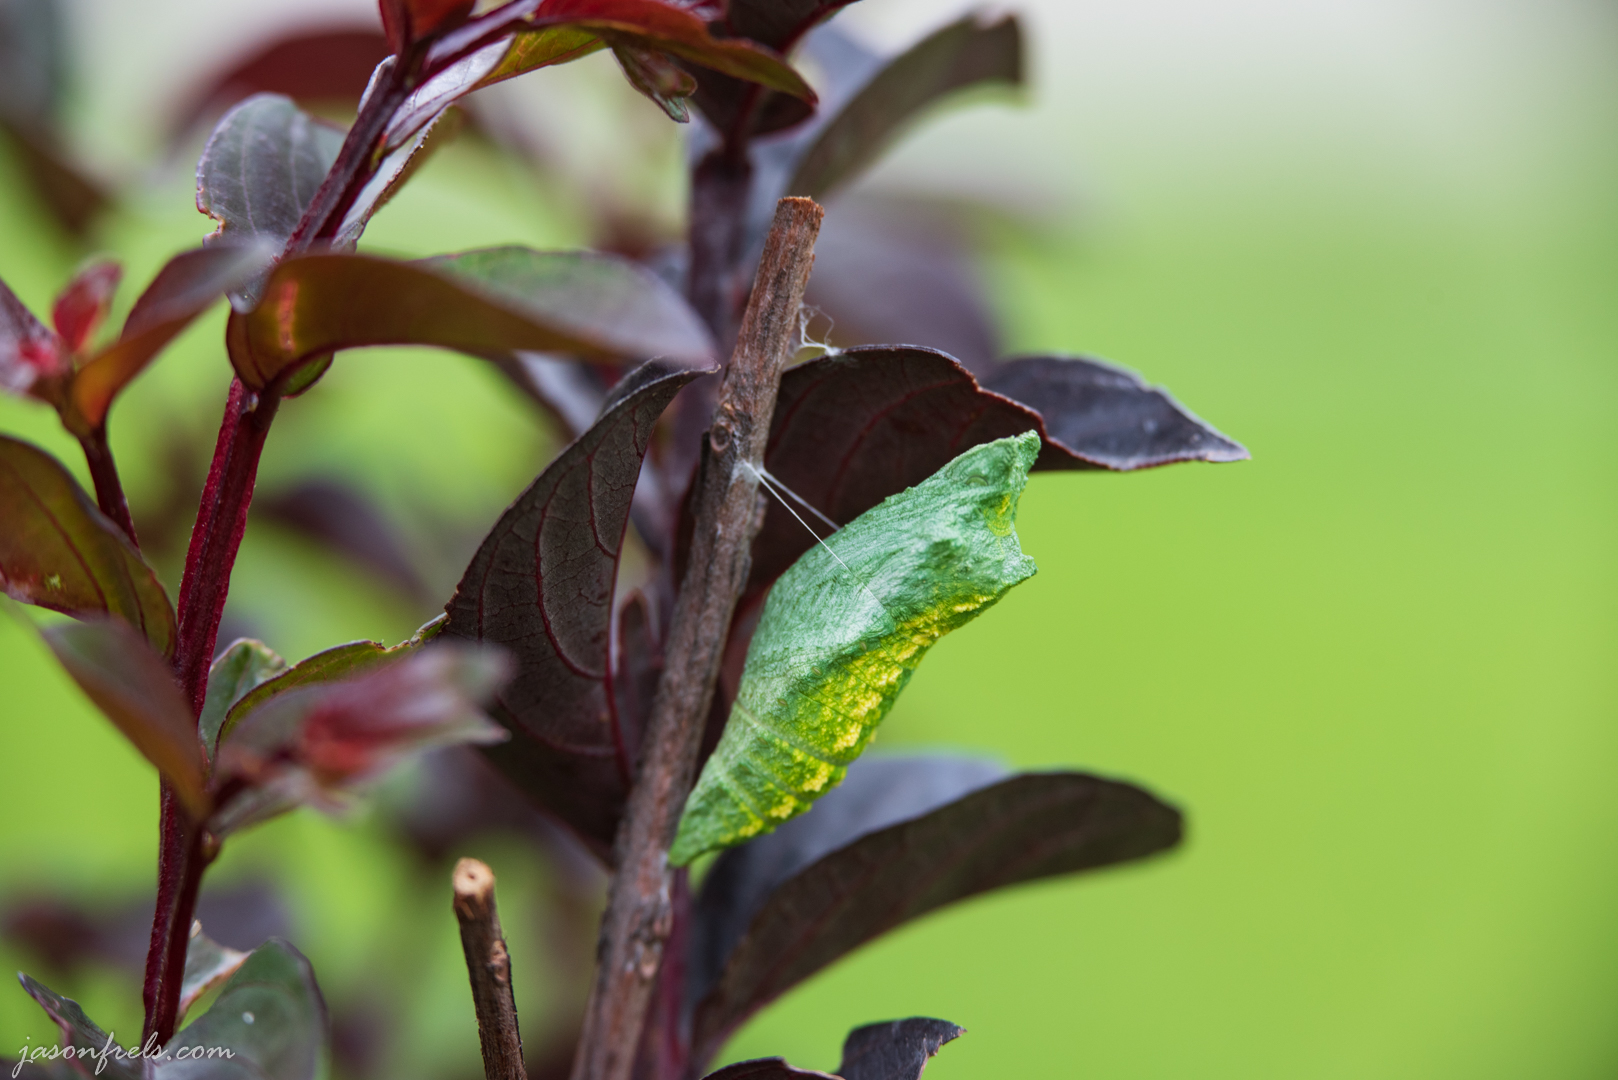
I began to feel a bit like an expectant parent, thinking about what is going on inside the cocoon, wondering what the due date would be, and wondering what the butterfly would look like. I read that it could take up to 2 weeks for the butterfly to emerge from the cocoon. During this time we got a lot of rain and a pretty strong wind and hail storm, but the cocoon hung on to the branch through it all, apparently prepared to deal with these sorts of things.
I began to check on its progress several times a day, hoping that I didn’t miss the event while away at work or elsewhere. I had no way of predicting the date and time that the butterfly would emerge. I watched for any movement from within the cocoon and never saw any. Is it still alive in there? Do cocoons fail sometimes? Would a predator find the thing? I dared not touch it or disturb it. I wasn’t exactly pacing up and down, smoking cigarettes, but I spent a great deal of time thinking about this. Nobody else in my household seemed to be interested in this in the slightest amount.
Saturday May 11, came around and the cocoon had made it to another weekend. Maybe I would be lucky and be home for the grand event. If I could catch it in time, I could set up a series of photos and make a time-lapse movie of the butterfly emerging. It rained most of the day on Saturday and I periodically checked on my friend. There was no activity.
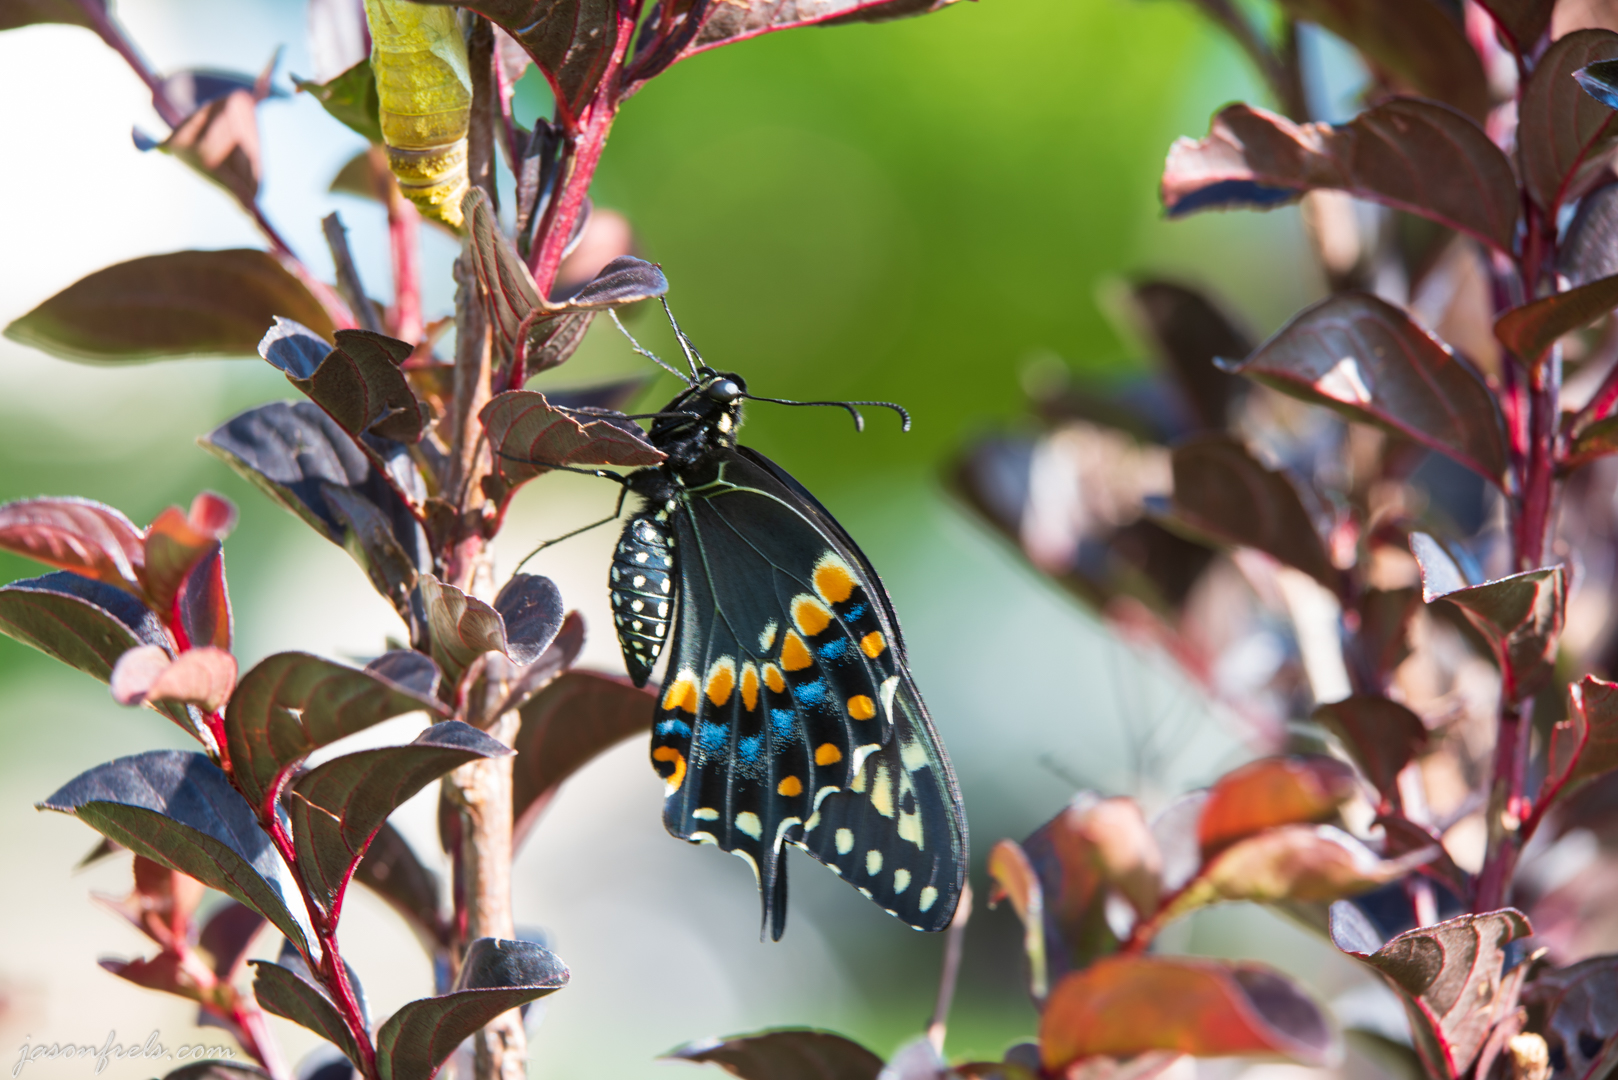
Sunday morning came and I checked on the cocoon repeatedly through-out the day. It had been almost two weeks and I knew that it had to emerge very soon. In the late afternoon I check and there was a beautiful butterfly perched next to the cocoon preparing its wings for flight. I didn’t get to see the emergence, but I got to take several close-ups of the new butterfly before it took to the air to live the second half of its life.
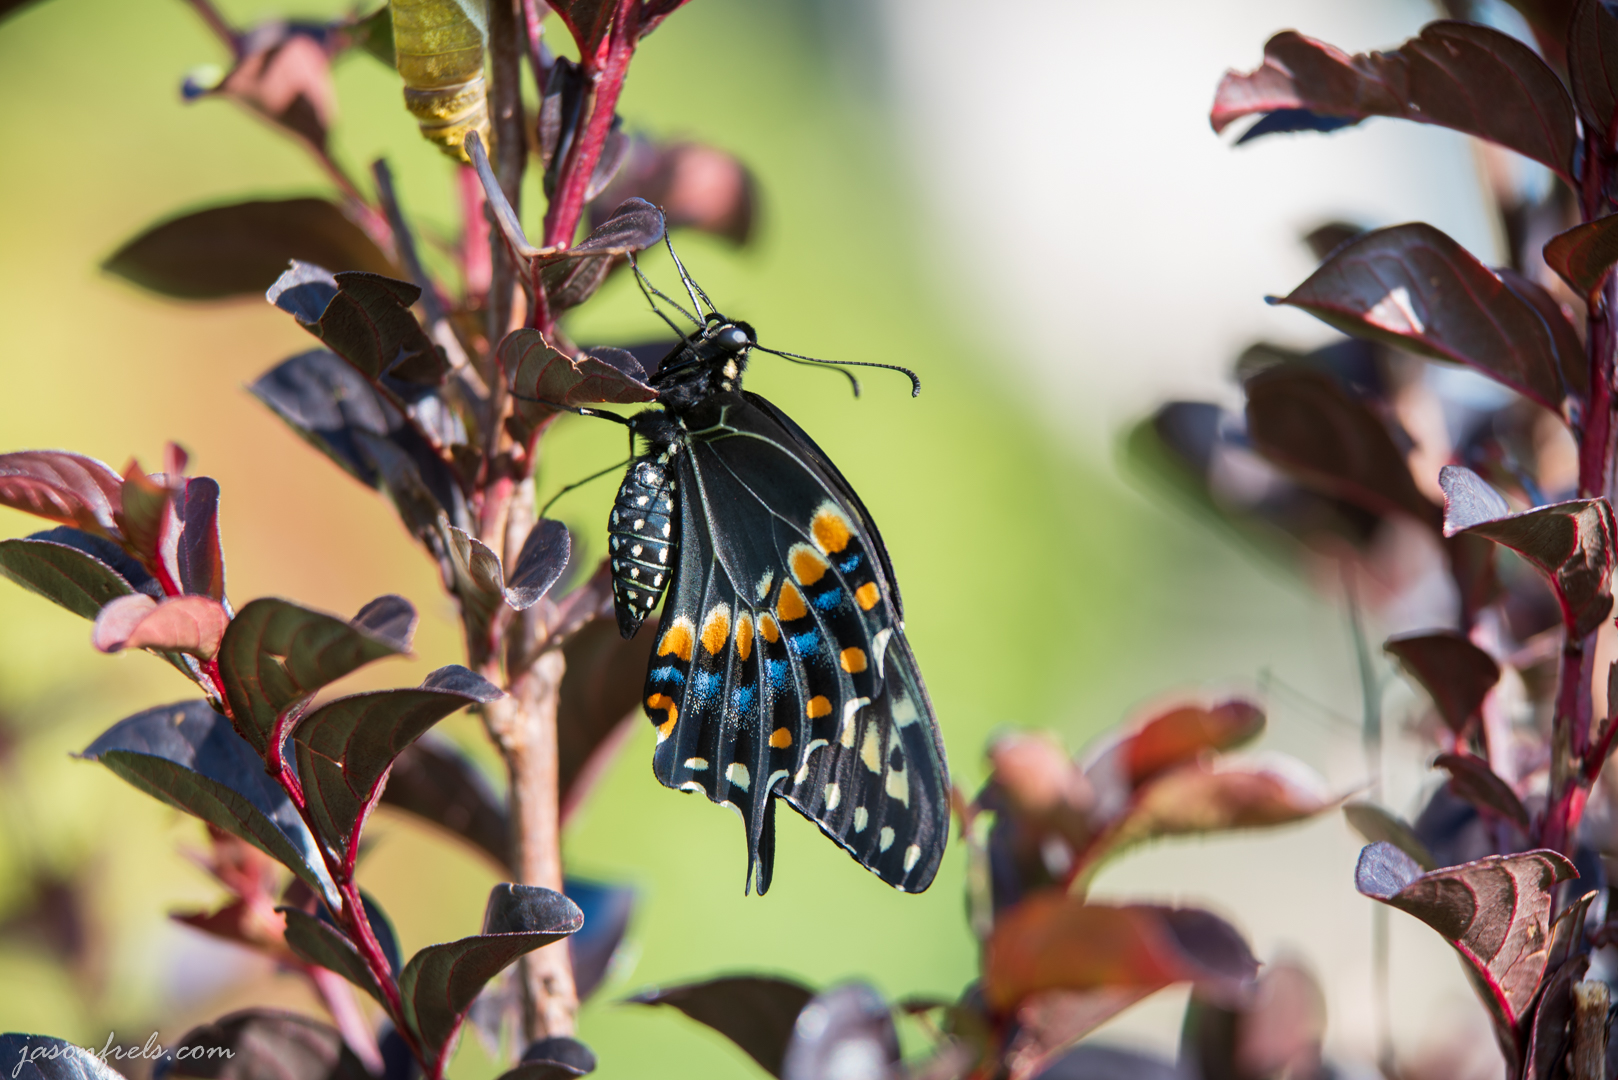
You can see the remnants of its cocoon on the branch just above it. The butterfly had crawled out of its cocoon and was waiting for its wings to be ready to fly. I have read that it can take 15 minutes or more for a butterfly to fill its wings with fluid to reach a state such that it can fly. This guy waited patiently in the afternoon sun while I took dozens of photos.

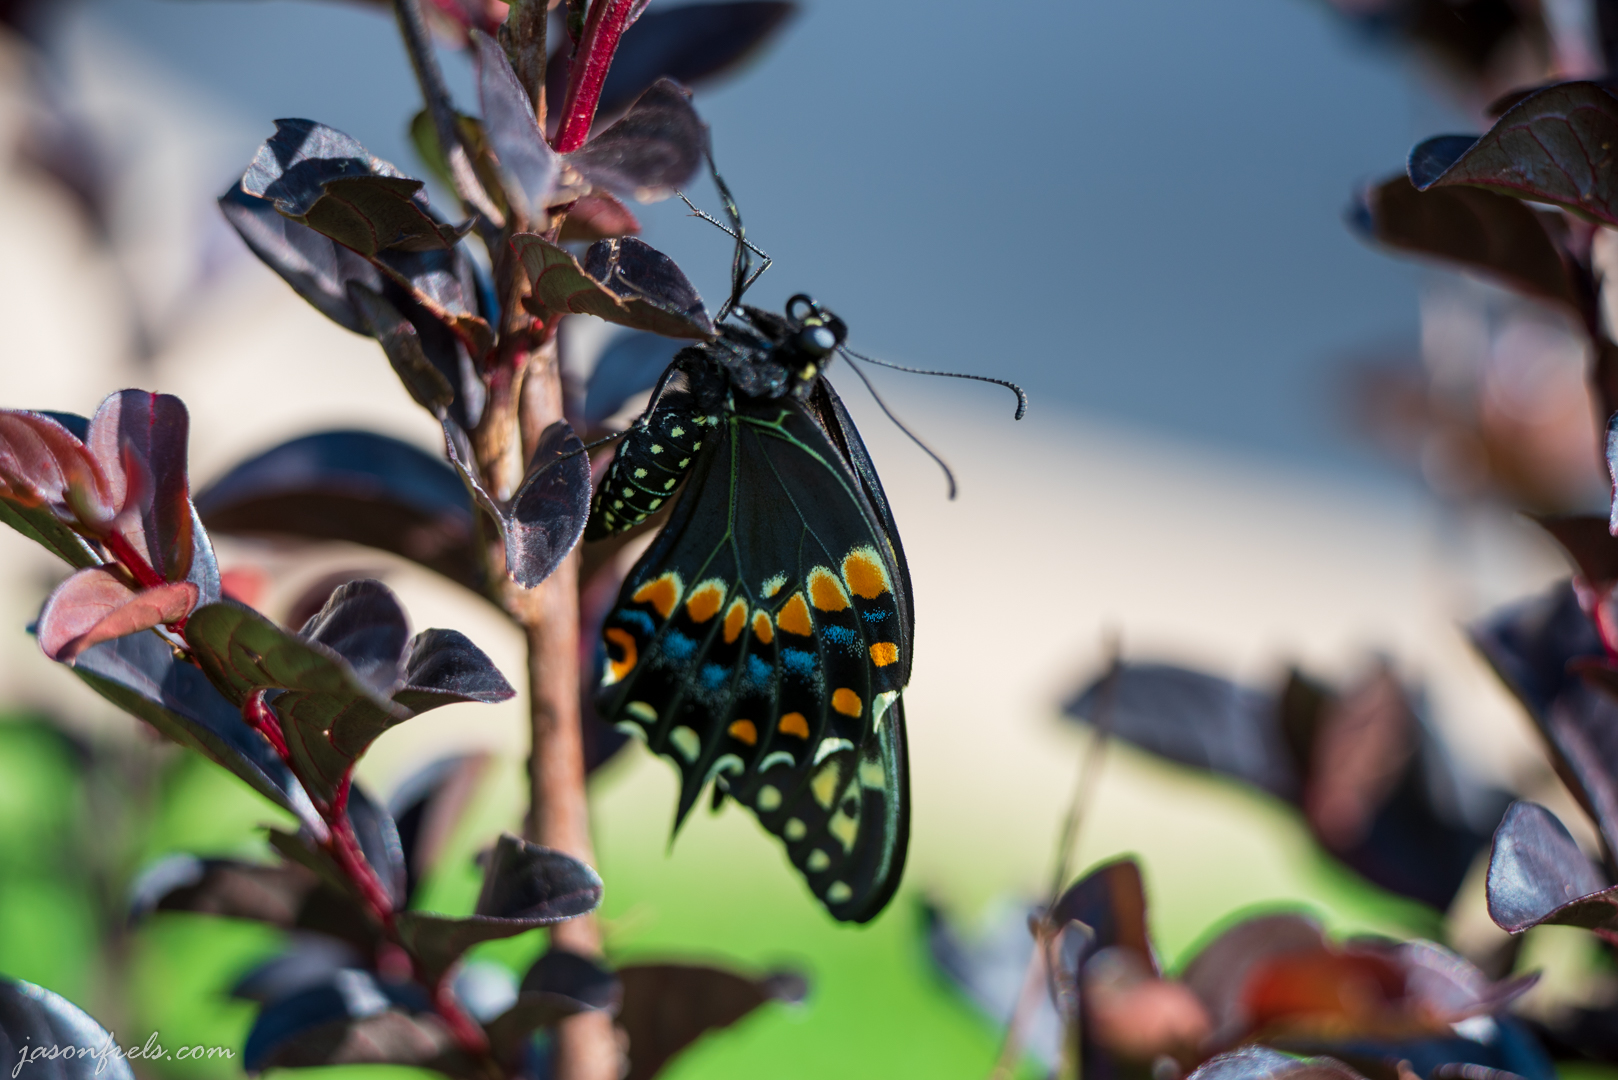
The blurry blue background in the above photo is my car, which I probably should have backed out of the way. But I was too excited by the picture taking and switching extension tubes to get the best photo.
After a while, the butterfly flew off to find nectar and a mate, I suppose. It was a fun time watching this creature transition from caterpillar to chrysalis to butterfly.
Getting a Macro Photo without a Macro Lens
Generally for close-up photos of something small, like an insect, one would use a macros lens. A macro lens is a specialty lens designed to allow focusing on an object very close to the lens, so that you can fill your camera sensor with the image of the subject. For comparison, Nikon makes a 200mm prime lens that has a reproduction ration of 0.12x and a minimum focus distance of about 1.9 meters. They also have a 200mm prime macro lens with a reproduction ration of 1.0x and a minimum focus distance of 0.49 meters. As you can see, this allows you to get a lot closer and fill the sensor with your subject. I don’t have a macro lens as they are kind of expensive and it is hard to justify the cost as I don’t shoot a lot of macro photos.
So, what do you do if you don’t have a macro lens? You can add extension tubes to your lens and make a poor-man’s macro lens. I have a 70-200mm lens and some extension tubes. The extension tubes are just hollow spacers that have no optical element and they allow you to increase the gap between your lens and the sensor which shrinks the minimum focus distance a lot. This allows you to get right up close to your subject. In fact, if you have a large enough gap, the plane of focus is right on your front lens element.
The photo below shows my camera with a 36mm and 20mm extension tube mounted between the camera and lens. These came in a pack of three stackable extension tubes of 12mm, 20mm, and 36mm and cost around $100. The extension tubes do have contacts to pass electrical signals from the lens to the camera, but I find that auto-focus does not work well when using the extension tubes.


The main drawbacks of using extension tubes are the very short focus depth and difficulty in working with the auto-focus mechanism. I found this set up (56mm of extension tubes) to be too much for what I was shooting as I had to get very close to the subject and any small motion would push the subject out of focus.
I found that using just the 20mm extension tube worked best for me in shooting the caterpillar and butterfly. But I still had to rely on manual focus and I had to battle between getting enough light and stopping down enough to get a deep enough depth of focus to get most of my subject in focus. Getting good focus was challenging as I had to watch the in-focus indicator in the view-finder, wait for no wind, try to hold very still, and make minute adjustments until I could achieve good focus. It was a trial and error process, but I managed to get a few good photos.
As a comparison between shooting with and without extension tubes I have the following two photos. The first photo below was shot at 200mm without the use of an extension tube. I had to squat down about 2 meters from the butterfly, but I was able to reliably use the auto-focus. The butterfly does get a bit lost in this picture. I could crop in, but I would lose a lot of resolution.

The next photo is shot at 200mm focal length with a 20mm extension tube between the lens and the camera; the image has not been cropped. Using the extension tube allowed me to get within half a meter of the butterfly and fill much of the sensor with it. Though you can see that there is very shallow focus depth even though I was shooting at f/8.
Getting photos this close up was a very time consuming process with many images that were blurry. It was difficult to hold composition, remain as still as possible, hold the shutter release half down, monitor the wind, and make tiny focus adjustments while keeping an eye on the focus indicator. But, with patience I got some good shots. There is also no way the butterfly would have tolerated all of this shooting if it had been able to fly away.
I hope you enjoyed my butterfly photos. I would love to have caught the butterfly emerging from the cocoon, but I got some good photos anyway. Leave a comment if you like.

So cool that you captured all of that. And it amazes me to look at the caterpillar before, and then the butterfly after. What a change in two weeks!
LikeLiked by 1 person
Thanks. It is been a mini hobby watching this thing. So glad I got to see the butterfly before it left.
I considered putting it in a terrarium to watch it, but I kind of wanted it to just go as it naturally would.
LikeLiked by 1 person
Probably was more rewarding just watching it happen naturally.
An unrelated note–I finally made it to Colorado Bend. My wife and I spent Saturday there hiking, and we nearly had the park to ourselves. We both loved it. I see why you spend time out there with your camera. I’ll post about it later in the week.
LikeLiked by 1 person
Which hikes did you take? I usually hike along the river trails.
A couple of Friday’s ago, I was planning to camp out there but it was closed because of the rain. Some of those roads out there flood. That may have been why you didn’t see so many people there. Even so, when I hike out there I don’t see many people except down by Gorman Falls.
LikeLiked by 1 person
I remember you saying you had to miss a camping trip there lately. We took the short hike to the spring, and then we took Cedar Chopper loop, Tinaja, Gorman Falls, and the scenic overlook trail. On the way back we took a few detours but mostly the same.
LikeLike
Interesting write up thanks.
LikeLiked by 1 person
Thanks
LikeLike